Tracklog
A GPS tracklog can serve as proof of reaching coordinates, or just make an interesting addition to an expedition page. If your GPS receiver has a USB port or a mini-USB port, or can interface with a device that does, you can probably record, save and upload tracklogs. If you don't know how to do that, perhaps this page can help. If you do know how, please help enhance this page for others.
iOZ5Uc <a href="http://mgazlzzzeglu.com/">mgazlzzzeglu</a>, [url=http://fflhvnpbrcar.com/]fflhvnpbrcar[/url], [link=http://cgfrcenpxhys.com/]cgfrcenpxhys[/link], http://xqxviyybjxfo.com/
Contents
Transferring a tracklog
If your GPS receiver came with software, now's the time to get out the CD ROM and install it. If you didn't get one or lost it, try the manufacturer's website. You probably need to have software installed before connecting your GPS receiver to your computer.
Connecting your GPS receiver to a computer
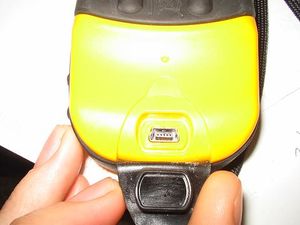
Your GPS receiver probably has a way to connect to a computer. You could have a mini-USB port hidden under a flap as pictured. If the GPS didn't come with a cable that connects to it, you may have a camera or other device that uses the same cable. They're also cheap to buy. If your GPS receiver is part of a computing device, like an iPhone then you don't need to connect it. Skip down to your software, if someone has made that section yet.
Map Source
The Garmin product is called Map Source. Once it is installed, start the program and connect your GPS. From the Transfer menu select Receive from device. It should find your GPS. Select the check boxes to receive Waypoints and Tracks (but not Maps and Routes). Then click Receive. You'll soon have the left hand pane of the program filled with log files, representing every time you've turned the GPS on and off.
First, use Ctrl-S to save the entire thing together. The default .gdb file works fine. Then save it a second time under a new name, the name of the expedition you want a tracklog of. Now delete everything that isn't the expedition you want. Each log line is tagged with the date, so it's very easy to identify what you don't want. Just highlight and delete everything with a date other than your expedition. If you're using UTC times be careful not to be confused by the UTC date starting/ending at a different time than your local date. Do the same with waypoints not relevant to your expedition. When you've trimmed everything you don't want, save it again. You should now see your route displayed on a crude map in the right-side pane. You're now ready to upload it.
Other software
If you're running some freakish unsupported operating system you probably already know where to go to look for for open source software to help you with this step, and very likely don't need a wiki help page on manipulating data.
Uploading tracks
There are multiple ways to upload your data and display it on a map to show your route. Add any you know.
Everytrail.com
http://www.everytrail.com - reads most file formats (gpx, kml, ...?), displays an interactive map and track statistics. You can add travel reports, geotagged photos and the like.
GPS Visualizer
Open the GPS Visualizer site in your web browser. Browse to your file, accept the default Google Maps format (you can change your mind later). Upload.
Hosting
The wiki does not currently accept KML files, so unless you save your map as a JPG or PNG you will need somewhere to host the file in order to link it from the wiki. Suggestions here ...
RTFM
Also check your user's manual. Many manufacturers make user manuals available on the Internet.
Difficulties or Questions?
If your GPS receiver or software isn't listed here, please ask about it on the talk page. If you know something about tracklogs that isn't listed here, please add it in.
