Bangarang

Bangarang is the name of Randall and James's trebuchet, pictured in the blag post of 14-06-2008.
Contents
Pictures and Video
21 June 2008
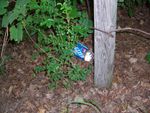
The projectile from successful test-firing #3
The point of impact from the same


Construction & Assembly - January-March, 2008
Technical Specifications

| (All measurements in feet and pounds) |
| L1 - Overall length of the throwing arm: Designed to be 12', actually 10' at present. |
| L2 - Length of the arm's longer section from the pivot point: Designed to be 10', actually 7'9" at present, with 5" additional from the pin. |
| L3 - Length of the arm's shorter section from the pivot point to the counterweight's suspension point: 2' |
| L4 - Length of the counterweight's support from the pivot on the arm to the center of mass (presumably): Designed to be 2', actually 4'2". |
| L5 - Length of the lines and sling when ready to be fired: Designed to be 10', will be adjusted until optimal for weight of projectile. Presently 5'. |
| H1 - Height of pivot point relative to the ground: Designed to be 8', actually 8'2" |
| H2 - Maximum height of supports on the main upright: 6'4", another set of supports not actually labeled in this quick diagram were in the rear at 4'2" vertically. |
The bend in the axle is presently 2.5" over 1'6", and the side supports are 5'2" high, extending 3' off the sides.
Weights were assumed to fall in roughly a 100:10:1 ratio between the mass of the counterweight, the arm, and the projectile. Theoretically, the actual masses aren't of such great importance from a ballistic standpoint so long as this ratio is maintained and the weights remain relatively fixed.
Thoughts from the designer
This trebuchet cost approximately $400 to build, but this could be done for less if we had known better what exactly we were doing. I have no real sense of the manhours it took, but it was quite manageable in our spare time - the main thing was having access to the tools necessary and the motivation to work on the project for long enough to make substantial progress. Personally, while I have an aptitude for mathematics and science, I have not much used any trigonometry or physics since my junior year of high school some seven years before designing and constructing this trebuchet, and most decisions were made mostly through the Socratic method - one of us would propose a method of doing something, the other would question the reasoning or offer another way to do it until we felt fairly sure that we had arrived at a reasonably good solution. We made sparing use of reference materials* and a shareware trebuchet simulator to get a rough idea of the best theoretical dimensions to aim for. In conclusion, we were hardly experts, and we pulled this off with a fair amount of guesswork in our spare time - you probably could too.
* The "reference material" we did make heavy use of was the owner of the shop, Michael. Besides allowing us to disrupt his well-equipped shop and make use of many tools which were somewhat heirlooms, he provided almost every solution to any problem that we couldn't solve between the two of us. The over-sized holes that needed to be cut for the pivot pipes, using gussets for strength while keeping the frame easily disassembleable, a poured-cement counterweight and many other of Bangarang's greatest features would never have been were it not for his invaluable assistance.
As for actual design features and procedural things such as that, most of the structure is 4x4 lumber - which actually measures more like 3.5"x3.5" - and is largely pine, I would assume. There are some 2x4s, as well as some plywood, but we essentially calculated the thickness and length we'd need, went to Lowes, and loaded up a truck for the majority of it. The wood alone weighs upwards of 300lbs, which I found somewhat surprising. The side supports were not originally planned - in the event that we did ultimately put the trebuchet on wheels, we didn't want the sides obstructing the trebuchet's movement in its theoretical track, but Randy ultimately convinced me that the lateral stresses were significant enough to add them. I wish I had taken them into account in the planning stages, but all in all, the wooden frame is quite sound, structurally.
Perhaps the best feature of the frame is the semipermanent construction techniques used. Gussets were used liberally for their structural strength relative to ease-of-construction. These would be attached to some piece of the frame permanently with wood glue and nails, but would be bolted to other pieces of the frame so that they would be removable. Nearly all the bolts used on the trebuchet are the same size and length, so that there is a great deal of interchangeability possible in the parts. This turned out to be more theoretical than actual in some cases, and in these cases, closed-end wrenches, WD-40, and substantial amounts of torque solve almost all problems. I remain relatively confident that the trebuchet could fire safely with nearly all nuts and bolts merely hand-tightened - the main thing is that the bolts are in place. All in all, one person could assemble or disassemble the trebuchet in about a half an hour, not counting loading time or the mounting/dismounting of the counterweight.
The counterweight is a 17 gallon (as I recall) storage bin of pretty durable plastic - more pliable than your standard plastic garbage can, but thicker. Rubbermaid's Roughneck line, if I'm not mistaken. We got a bag of the concrete which had the heaviest figures on the back, as we were aiming to maximize weight/volume, and a bag of sand. In retrospect, we should've just gotten quikcrete or something more idiot-proof, because we ended up mixing it at a 2 part sand : 1 part concrete ratio and adding too much water for it to set properly. The end result was a counterweight far heavier than planned that has a tendency to erode inside the bucket. The weight could be compensated for by removing some of the concrete, but combined with the fact that the weight is liable to erode in the rain, the most workable solution seems to be strapping the weight into the bucket permanently. To support the weight, a lattice of 1/2" galvanized pipe was sunk into the wet concrete with a T-joint extending upwards - more galvanized steel piping telescopes into a pipe in the end of the throwing arm. This has held up surprisingly well, despite obvious rust covering the surface.

The sling is made of two-ply denim from an old pair of jeans sacrificed to the cause. The diagram to the right illustrates generally how the sling was shaped - the lines from point 10 to point A and point 5 to point A were sewn together, and a similar joining was made on the opposite side. A few grommets were placed in the ends to reinforce the ropes' attachment points, but all in all, this was only a little more than an hour's work.
The trigger mechanism presently used is rough at best. This was never planned for because it was so unknown how the final mechanics of the trebuchet would actually work - it needed to be at a point on the arm where both the sling and the counterweight would not hit any crossmember the trigger would be mounted upon. It is essentially a standard quick-release mechanism formed by a bolt running through three eye hooks - one on the arm, two on the board mounted to the base. The bolt is quickly removed by a pull of a rope, and the sling passes beneath the trigger while the counterweight swings (presumably) above. To be honest, I've not watched the mechanics of the counterweight nearly as much as I've watched the movement of the sling.